Here is a little background on this article...
Several years ago I decided to start self-hosting my own Kubernetes cluster not knowing the complexities and pitfalls of doing so.
This is a kind of compilation of things I've learned along the way and wanted to pass them on to anyone facing the same challenges.
If you've never self-hosted Kubernetes then you may not be aware of the critical pieces of
it that keep it running, Etcd
being one of them. Etcd is the distributed key value store for the clusters data, without it
can't function. Here are some of the lessons I've learned running my own cluster over the
years.
Etcd has native tools for backing it up and restoring it.
One of the tools I have used for backup and recovery is Etcdctl, a command line tool for
mananging Etcd. The concept is pretty simple you take a snapshot of the database and save it
to a file. However, where it gets complicated is that if you are running a multi-node
control plane cluster you have to use that snapshot and restore everyone of the Etcd nodes.
Here is a reference to the documentation on it:
Restoring overwrites some snapshot metadata (specifically, the member ID and cluster
ID);
the member loses its former identity. This metadata overwrite prevents the new member
from inadvertently joining an existing cluster.
Therefore in order to start a cluster from a snapshot, the restore must start a new
logical cluster.
In most tutorials for self-hosting Kubernetes they will go with a basic three node setup with one control plane and two workers.
This is fine in most cases but if you are looking for HA it won't work, the moment you have to shutdown or reboot that control
plane your cluster will become unavailable. These are my tips on setting up an HA cluster and moving from a single control plane to many.
Use a Load Balancer
An external load balancer is a great way to make not only your control plane highly available but also your workers.
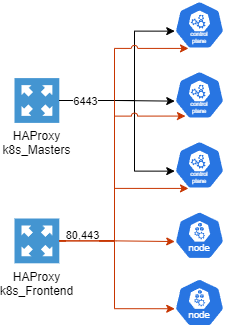
In my setup I use the HAProxy package in pfSense to load balance my control planes and workers behind a virtual IP.
Below is a diagram of how I have setup my control planes and nodes. Port 6443 is load balancing the kubernetes API endpoints for the control planes and
80 and 443 are for all nodes.
HAProxy Diagram
Update your control plane components and kubelet
On each control plane there are kubeconfig files for each of the Kubernetes services that run as Pods in the cluster. These can be found in the
/etc/kubernetes directory and need to be updated (example below) to use the load balancer to contact the kubernetes API endpoints. But the first step before this is
updating the certificate with the IP of the load balancer as a SAN so the kube-api servers won't reject the traffic. An entire walkthrough of how to do this I found
on Scott Lowe's website
Unlike a Kubernetes cluster hosted in a public cloud, a self-hosted cluster doesn't have the same storage provider options. Automatically provisioning
persistent volumes doesn't work so if you require storage that you don't want tied to a specific node then NFS is probably the best option.
The networking with Kubernetes can sometimes be a little complicated and easy to break. Below are some of my tips from breaking my clusters many times
and having to diagnose and repair it as well as things to make your life easier when exposing applications.
Keep your CNI updated
CNI stands for Container Network Interface and allows the pods/containers in your cluster to communicate.
You should check your CNI version whenever you update the cluster version of Kubernetes to ensure it's on a supported version. I personally use Calico but there
are several out there to pick from CNCF CNIs
Use an Ingress Controller
If you aren't familiar with Ingress here is a
link
to the documentation on it to get started.
An ingress controller can be kind of a headache to setup to begin with but it will save you time in the end. You may be asking yourself what is an ingress
controller and what does it do? What it does is acts as a layer 7 load balancer looking at the HTTP requests and routing the traffic to backend services
based on the URL.
August 30 2018
More Equipment!
Another server joins the cause!
A Dell PowerEdge R710 Gen 11 was graciously given to me and I really appreciate it as it can handle way more
memory(way more than 8GB haha) than my current XCP-ng server. Only catch is it came with 3GB of memory so
I'll be purchasing 48GB of memory to replace that and get it up and running.
In addition to the R710 I also received a T710, which if you don't know the difference between the two, the
T710 is a tower version of the R710 and can handle a little less memory than the R710 but has more drive
capacity. The T710 will take some more time to get up and running but eventually it will be another XCP-ng
server.
Once the T710 is up I plan on turning the old XCP-ng server into a FreeNAS storage platform for backups and
possibly for VM storage.
July 19 2018
Rack Setup
The rack is setup and has a couple pieces of equipment in it.
So far this is what I have setup.
Firewall
24 port switch
Web Server
Database Server
XenServer, running the below VMs
SubVersion
Chef Server
APC 1500 UPS
APC 750 UPS
July 15 2018
First Iteration of Server Lab
I've begun putting together my first iteration of my home server lab. The lab is moving to a different room
in the house and I have a 42U rack that I plan on using for network equipment and servers that are rack
mount.
I plan on purchasing a rack mount PowerEdge server and putting XCP-ng on it, which is a spin off of XenServer. After that I'll start putting a plan
together on what VMs I want to run on it. I know for sure I'll be setting up a dev server for my website.